Saturday, August 21, 2010

Help! I'm stuck in the bathroom!

So the first week of school has come to a close, and it's been pretty fun! The first day was a bit exhausting for me, though, because this is my first year teaching second grade, and it's also the youngest grade-level that I have taught. So while I knew these kids would be different from the third graders that I am used to, and that they would be more needy than the kids I was used to, there were definitely some surprises that kept life interesting for me on Tuesday!

Something I was not anticipating was that using the "big bathrooms" posed more of a challenge for these kids than I had expected. Before 2nd grade, the kids are used to having a bathroom in their classrooms, and so they don't need to use the big bathrooms so much. But once they reach second grade, we no longer have classroom bathrooms, so they have to get used to the big bathrooms. I already had planned to teach and model procedures for going into the bathrooms and washing hands afterwards (only use one squirt of soap; use no more than 2 paper towels; throw away your paper towels by placing them in the trash can), and we discussed behavior expectations during our bathroom breaks. The kids had agreed that the bathroom is not a playground, so instead of climbing on stalls, they knew they were to just go in and go about their business, wash their hands, and exit in a timely manner. They actually did a very nice job going in and out quickly, and not wasting any time. However, we were not without problems.

A few of the girls in my class find the locks on a couple of the stalls rather difficult to unlock, and it has caused for some rather humorous situations. On one occasion, all of my kids were out of the bathroom except for two girls, so I was monitoring my line in the hall. A fifth grade teacher, who was standing in closer proximity to the girls' restroom, informed me that he thought he heard a couple of my students calling my name. So I set off to investigate, thinking one of them was suffering from another stomach ache. When I went in the restroom, I found both of them stuck side-by-side in their respective stalls, unable to get the locks open! All I could really do at the time was just tell them to push on the lock harder, and after a little bit of effort, they were able to get their doors unlocked. These two girls have gotten stuck in their stalls on other occasions as well, but they are getting better at unlocking the stalls now. However, I did recommend to them that they avoid using the two stalls that they find difficult to unlock.

So, sometimes you never know just what skills the kids you teach are going to find the most difficult. Sometimes things that we take for granted as being a simple skill, such as unlocking a door, can actually be very difficult for children. However, I just remind myself that they are still essentially first graders right now, and I know it won't be too long before they have adjusted to being second graders. I am having a lot of fun with this class so far, though. My students are all excited about being in school, they get along well with one another, they are nice to each other, and they share well. I think this is going to be a great year!

Saturday, August 14, 2010

Setting Up My Classroom, part 5: Ta Da!

Well, after 2 weeks of work, I think my class is more or less set up. Of course there will be things I add throughout the year, such as anchor charts (charts that help the kids remember what we are learning). But so far, everyone who has seen my classroom says it looks great, including my principal! I got to meet some of my 2nd graders and their families yesterday afternoon, and they all seemed to like it, too. Here are some pictures of the results:
Classroom library has been organized. Nurse Kathy helped sort the books by genre, and I labeled them so that the kids will know where to put them back. This also helped me see which genres I need more of. Books related to the curriculum of the moment will be placed on the rotating book rack on the far left. Right now, I have displayed books related to "back to school." My principal told me that as part of a grant we will be receiving, some money will be allotted to build teachers' classroom libraries, which is great for newer teachers like me who haven't had much of a chance to build a huge library yet. Until then, I will be supplementing my classroom library with books I check out from our school library.
I have my number line posted now, and my word wall is ready to go. This year, I am making my word wall more interactive by using magnetic strips on my chalk board. I am going to attach a piece of magnetic tape to each word that we put on the word wall so that the kids can take them down and put them back up more easily. I got this idea from Debbie Diller's Spaces and Places. The first words that will go on the word wall will be the students' names.
Since the students will sit at tables this year and not have their own space to store supplies in desks, I purchased four of these 5-drawer storage systems at Target. Each drawer is labeled with a different subject. Students will store their folders, notebooks, and workbooks in the drawers based on subject, and I will have team captains at each table who will be in charge of getting out and putting away the supplies as needed. I chose to designate the largest drawer for reading, since students will need a lot of space to store their books for independent reading. I got this idea from a professional development session I attended over the summer.
To store supplies such as markers, crayons, scissors, glue, and pencils, I purchased four of these caddies from Target (you can find them in the aisle with the cleaning supplies such as mops). I already had some plastic cups that I am using to hold the pencils and scissors to keep them more organized. The sharp pencils will be kept in the black cups, and the pencils that need to be sharpened will be kept in the blue cup.

Finally, I just wanted to answer a question from earlier on about where I am storing the "unsightly" things like paper towels, etc. now that I am not storing them in my large cabinets. I am using some big plastic storage containers to hold these items, and then storing containers under tables such as the computer table and the teacher desk. They stay out of the way and out of sight there, leaving more cabinet space for items I need to have on shelves, but don't want the kids to use, such as teacher resource books and teacher manuals.

So with the classroom pretty much finished now, that gives me the rest of the weekend to finish getting my lesson plans for the first week put together, as well as my beginning of school newsletter to parents. I have meetings all day on Monday, and the first day of school is on Tuesday. I am really looking forward to this year!!!

Tuesday, August 10, 2010

Setting Up My Classroom, part 4: The Dreaded Bulletin Boards

Countdown: 2.5 days until I need to have to room ready for Ready Fest/Meet and Greet.

Something you need to know when trying to set up a classroom is that it is important to recruit help and not try to do everything on your own. This way you can get a lot more done in much less time.

I already wrote about my recruitment of Architect Dan to help arrange the furniture last week, and since then I have received a lot of comments from coworkers about how nice my room arrangement looks.

Yesterday I recruited my mom, Nurse Kathy, to help organize my classroom library. That was a big job, and she spent the whole day on the task, which freed me up to work on organizing some other things around the classroom that day. There are still a couple more small things to do with the classroom library, so I'm not going to go into a lot of detail on that yet.

Today I tackled the last of the really big jobs. First I finished organizing my files in my filing cabinets. That was one of the least exciting tasks, but at least I got everything sorted out so I should know where to find all the important papers that I will need throughout the year, as well as having a place to file papers that come in.

The other big job I conquered today was repapering the bulletin boards. If you refer back to the "before" pictures of my classroom (Setting Up My Classroom, part 1), you will note that the paper used to cover the bulletin boards by the previous teacher was mostly red and yellow. Personally, I've never been a big fan of the red/yellow color combination on anything--it reminds me too much of ketchup and mustard. Also, the walls in this classroom are already painted a pale yellow, so I felt that the addition of the yellow paper was just too much yellow. I felt a cooler color was needed to calm down the atmosphere of the room. Debbie Diller also talks about the effect of color in her book Spaces and Places. So here is what I came up with:

My color scheme was inspired by the star bulletin board seen in this picture. That is actually a weird sort of bulletin board that you can't actually staple things to, so a teacher several years ago had decorated the board with star-patterned contact paper. Sticking with that color scheme, I chose blue as the predominant color for my bulletin boards.
This bulletin board in the back of the room was quite large. Part of what I dislike about decorating bulletin boards is trying to cut all the paper to fit as well as possible, and then trying to staple the giant sheet on there. So for this bulletin board, I recruited the assistance of my Trusty Assistant. She helped hold up one side of the paper while I stapled, and then we switched.
Another thing I would like to point out about this bulletin board is that I stapled the number line low enough where the students can reach it. This is quite different from what I have done in the past, and what you generally see in classrooms--usually you see the number line running along the ceiling. The reason I hung it lower was so that the students will be able to interact with the number line, which is encouraged in Math Investigations. It also goes along with Debbie Diller's advice about hanging resources at a level where students can interact with them more easily.
On the board behind the classroom library, I used a slightly more brightly-colored border to add a little bit of excitement.
Next to the SMART Board, I have hung up my pocket hundreds chart, but I haven't put the numbers in it yet. Like the number line, I tried to hang this in an area where students will be able to interact with it.
I think this looks pretty good so far!

I don't have pictures of my hallway bulletin boards yet, but I will mention that I did get the paper up on those as well. For those, I recruited the help of the daughter of my neighboring teacher. She is in 5th grade this year and has a lot of experience helping put up bulletin boards, so when she asked me if she could help with mine, I said "Yes!" Teachers that have children often have to bring them to school with them while they work on their classrooms, and you will find that the older ones (about 3rd grade and up) are usually looking for something to do while they are there, and tend to be very good helpers. In fact, I think they actually enjoy putting together the bulletin boards!

How do you feel about bulletin boards? Do you actually like putting them together, or do you get someone else to help you? How do you decide on colors to use when decorating?

Thursday, August 5, 2010

Setting Up My Classroom, part 3: Architect Dan Moves Furniture

Today I finally was able to take a break from organizing materials to conquer a big job--moving furniture. As you may have noticed in my "before" pictures, the custodians had just shoved all the furniture back into the room wherever they wanted to put it, without much thought as to where the teacher might want it (as a side note, we are in the process of hiring a new site manager, and one guy who is up for the job and currently helping around the building said he was shocked to see that done--he says if he gets the job, he will have teachers map out where they would like their furniture to be before they leave for the summer, and after they are done waxing floors and whatnot, he and his team would put the furniture where the teacher requests it. So, here's hoping he gets the job!). This was not a task I could conquer on my own, so I recruited the services of Architect Dan since he would be able to give me some ideas of where he thought furniture might work best.

Here are some pictures of what we came up with. Please excuse the mess, as I'm still in the process of organizing and storing materials.
Architect Dan sits at the small group table. This is in the corner close to the teacher's desk.
Architect Dan sits at one of the student tables, near my "science inquiry table." I am using four tables in my classroom, each which will seat 6 students. The small desk with the red chair is a special desk for the Star Student of the week.
Architect Dan calls on an imaginary student in the whole-group instruction area/classroom library. We chose this space for whole group instruction since the SMART Board is mounted here. After this picture was taken, we did end up moving one of the grey bookshelves that are stacked in the corner so that it is more at student level. We also used some of the bookshelves as makeshift partitions to create a cozy space for the class and for students to work in independently. (The giant black and white boxes will be gone soon--those are science modules I need to deliver to other classrooms).
Architect Dan sits on the reflection desk (also known as time out). He thinks I should put a dunce cap there. I explained that people don't do that anymore. Here you can also see the fourth student table. There is also a small grey table in this picture, but we ended up moving that next to the computer table, where hopefully I will not run into it this year.

Obviously, I'm not finished and still have things to put away. I am getting rid of a lot of stuff, some of which I didn't even know I had, but just had inherited from previous teachers, and some of it was pretty dated. Our favorite find was a record (yes, a record!) that was still in its shrink wrap and supposedly contained music that will "get kids moving!" The back included a quote from and a photo of Scott Baio. Obviously, I won't be using that in my classroom!

Do you like what you see so far in the pictures? Is there anything you think I might do differently?

Tuesday, August 3, 2010

Setting Up My Classroom, part 2: Organizing My Teacher Resources

First I would like to explain that I really enjoy organizing things; I just don't always have time to get organized. That's probably why for the past 3 years, my classroom has been a disorganized mess, and impossible to find anything I need--first from a lack of time to get set up (as I mentioned before, my first year teaching, I only had a few hours to make my room look presentable) and then from a lack of experience (even the past couple of years, I still don't think I had figured out the best way to organize a classroom). This year, however, I am taking my time during these two weeks before school starts to really get my classroom organized and in order. To be honest, I find this task extremely fun to do. So today I am very excited to share with you how I have organized one of the big cabinets in my classroom.

In previous years, I had viewed the big cabinets as sort of a "catch-all" for anything I didn't know where else to store, and wanted out of my sight. They always ended up overflowing with paper towel rolls, boxes of Ziplock bags, extra school t-shirts...who knows what else? They tended to get to the point where when you opened the doors of the cabinet, things would start falling out. It kind of reminded me of The Berenstain Bears and the Messy Room, when Mama Bear opens the cubs' closet door and an avalanche of toys knocks her to the ground. I didn't want that to happen again this year.

So I took a different approach this year. I was trying to figure out what to do with all of my teacher resource books because I do have a lot of them, and I didn't want to take away bookshelf space from the students' supplies and books. I decided to try storing them in one of the cabinets. Here are the results:
I'm a big fan of this so far. After all, the kids don't need or want to see what teacher resource books I have, so what would be the point of me having them visible?
Here is a close-up of one of the top shelves. This shelf holds general resource books on the left in alphabetical order, and the right side holds books related to management and CARE for Kids (Jefferson County's school community initiative).
This picture shows the next two shelves. The one on the top is my literacy shelf. The left side holds books related to reading skills in ABC order. In the middle, I have the bin that holds the books for the Making Meaning literacy program. On the right side, I have my writing resource books in ABC order, followed by my Rigby teacher's manual.
The bottom shelf in this picture is a science/math shelf. I organized these materials a little differently. First I have my science module teacher manuals, with their corresponding student books next to them. In the middle, I have some random science resource books in ABC order. On the right, I have my Math Investigations II teacher guides.
Finally, the shelf on the very bottom holds the remainder of my math teacher resources. The old Math Investigations program is in the box on the left, followed by an assortment of math teacher resources in ABC order. The bin on the right holds some blackline masters for various Math Investigations activities. Stacked on top of the bin are some educational games.

So I'm pretty happy so far with this new system, and I'm excited to see how it works for me throughout the year. I hope some of you found this to be somewhat useful, especially if you're trying to figure out how you want to organize your own classroom materials, and otherwise, I hope it wasn't too boring for you!

Monday, August 2, 2010

Setting Up My Classroom, part 1: The "Before" Pictures

Today was my first day back at school I had left for the summer. I am moving classrooms this year (again) and I have 2 weeks to get everything set up the way I want it. That's pretty good, considering that when I first got hired, I only had a few hours to set up my classroom! So I'm really wanting to put some effort into it this year and create a space that the kids and I can keep organized. More importantly (or I guess, just as importantly) I want it to be a place that is inviting and comfortable, and gives students the ability to work in cooperative groups more easily, as well as inquiry-based instruction. So I have been studying Debbie Diller's bookSpaces and Places all summer to get some ideas of where to start.

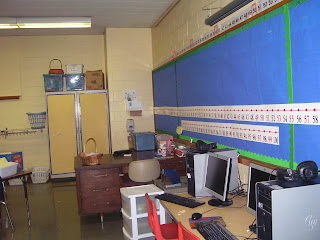
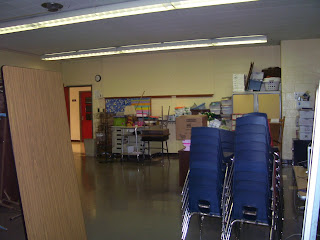
When I entered my classroom, this is what it looked like:


As you see, it's pretty much a blank slate right now. I have no idea why the custodians decided it was a good idea to leave the tables set up on their ends like that.

I didn't really move any furniture today. I did make an attempt at a floor plan (in crayon):
The blueish-green writing represents things that are in the classroom that will not (and cannot) be moved. In the middle, I listed all other large furniture items that can be moved somewhere. The red writing represents my thoughts on where I might like to have certain areas of my classroom located.
But, as you can see, I am not too good at making floor plans, which is why I am "hiring" Dan to assist me. With his architecture background, he should be able to help me come up with some nifty ideas on how to arrange the furniture.
So instead of moving any furniture today, I worked on organizing and storing some teacher resources. I'll write more about that later.

Does anyone have any useful suggestions for my classroom? Or, more importantly, is there anyone who would like to come help me move things around sometime this week or next week:-)?